CIS195 Web Authoring 1: HTML
More Page Layout Using CSS
| Topics by Week for the Eight-Week Term | |
|---|---|
| 1. Intro to HTML | 5. Midterm, Layout with CSS |
| 2. More HTML, file paths | 6. CSS Grid and Flexbox |
| 3. Site structure and navigation | 7. HTML Tables |
| 4. Formatting with CSS | 8. HTML Forms, Final |
| Topics by Week for the Ten-Week Term | |
|---|---|
| 1. Intro to HTML | 6. Layout with CSS |
| 2. More HTML, file paths | 7. CSS Grid, Flexbox |
| 3. Site structure and navigation | 8. HTML Forms |
| 4. Formatting with CSS | 9. Multimedia, Final |
| 5. Project Propposal, Midterm | 10. HTML Tables, Project Completion |
| 11. Final | |
Contents
Q and AThe Box ModelSetting the border styleSetting the width of border, margin or paddingSetting ColorsBorderPaddingMarginCombined SettingsCreating Rounded CornersExampleReferences
Q and A
Any questions about the midterm?
Are you getting started on the term project?
Did we look at the requirements?Don't forget the quiz that closes before class on Thursday.
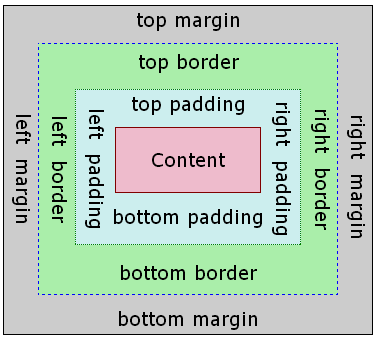
The Box Model
All HTML elements can be thought of as having a box that wraps around the element's content with the three layers shown below:
Setting the border style
By default, the border is not visible. You need to set a visible border style before you can see it. These are the options for border-style:
none—Displays no border.
hidden—Displays no border unless an image is set.
dotted—Displays a series of dots.
dashed—Displays a series of dashes.
solid—Displays a single, straight, solid line.
double—Displays two straight lines that add up to the pixel size set by border-width.
groove—Displays a border that looks like a v-shaped groove.
ridge—Displays a border that looks like a v-shaped ridge. (The opposite of a groove).
inset—Displays a border that makes the element appear embedded.
outset—Displays a border that makes the element appear embossed. (The opposite of inset.)
Example:
p { border-style: groove; }
Setting the width of border, margin or padding
Example of setting all widths:
div { border: 10px; padding: 15px; margin: 20px;}You can set border, padding and margin independently for each side:
border-top Example:
border-top: 5px;border-right Example:
border-right: 10px;border-bottom Example:
border-botton: 15px;border-left Example:
border-left: 20px;
You can set them all at once using the shorthand property. The sequence is: top, right, bottom, left.
Example: border: 5px 10px 15px 20px;
Setting Colors
Border
You can set the color of the border like this: border-color: blue.
Padding
The color of an element's padding will be the same as the background color of the element. You can't set it separately.
Margin
The color of an element's margin will be the same color as the background of whatever element contains it. You can't set it separately. For example, a section contains a paragraph:
<section> <p>Some text.</p></section>If the section has a blue background, and it contains a paragraph with a 10px margin. The margin of the paragraph will be blue too. Here's are the CSS rules that would do that:
section {background-color: blue;}p {margin: 10px;}
Combined Settings
You can set width, style, and color in one property like this:
p { border: 15px solid blue; }
Creating Rounded Corners
Use the CSS border-radius property to give a block element rounded corners.
border-top-left-radius—Sets the radius of the top-left corner Example:
border-top-left-radius: 5px;border-top-right-radius—Sets the radius of the top-right corner Example:
border-top-right-radius: 10px;border-bottom-right-radius—Sets the radius of the bottom-right Example:
border-bottom-right-radius: 15px;corner border-bottom-left-radius—Sets the radius of the bottom-left corner Example:
border-bottom-left-radius: 20px;border-radius—Shorthand for setting all the four border-radii. They are set in clock-wise order stating at the top-left corner.
Example: border-radius: 5px 10px 15px 20px;
Example
References
 Web Authoring Lecture Notes, written by Brian Bird in 2018 and revised by Brian Bird in , are licensed under a Creative Commons Attribution-ShareAlike 4.0 International License.